NextJs Parallel Routes
NextJs Parallel Routing allows you to render multiple pages in the same layout view. You can utilize this functionality for List - Detail View pattern, to show list of items and selected item detail in the same view.
Content
Setup
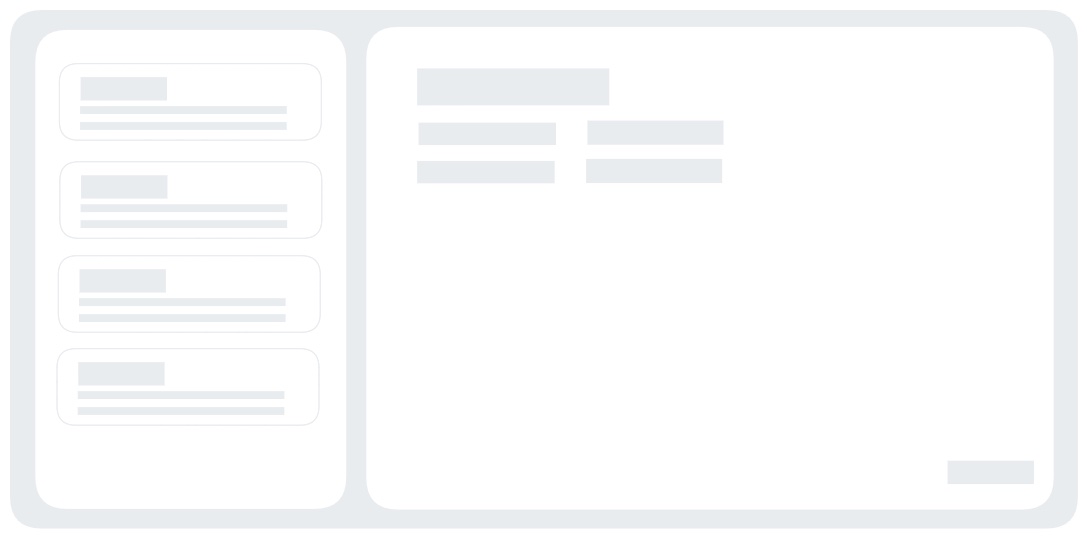
Parallel routing makes it easy to display list and detail UI in the same view using two separate pages, one page for list of items and another page for selected item detail.
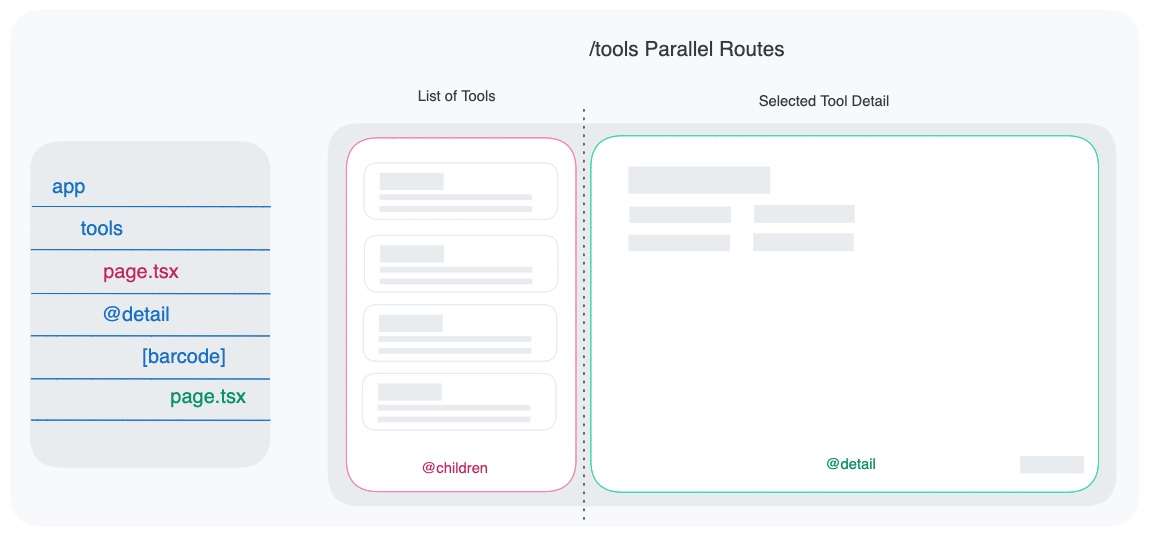
Parallel routes are created using named slots. Slots are defined with the “@folder” convention, and are passed as props to layout. For showing list of children, we use the default “children” slot and display them as a column List in left column. When user selects an item from the list, we want to display item details in the right view. To display item detail, we will define a “@detail” slot. With this setup, default children shows item list page and @detail slot displays the selected item detail page.
Lets code above UI using NextJs parallel routes.
Stater Project
Create a NextJS app using
npx create-next-app@latestnpx create-next-app@latestName your project "parallel-two-col" and accept rest of the defaults.
Seed
Create a new top level directory called “data” and create a file inventory.json. Copy following inventory items, which will be used to display list.
[
  {
    "tool_name": "Hammer",
    "manufacturer": "Stanley",
    "model": "STHT51304",
    "barcode": "0123456789012",
    "photo": "hammer.jpg"
  },
  {
    "tool_name": "Screwdriver",
    "manufacturer": "Craftsman",
    "model": "CMHT65045",
    "barcode": "1122334455667",
    "photo": "screwdriver.jpg"
  },
  {
    "tool_name": "Pliers",
    "manufacturer": "Klein Tools",
    "model": "D2000-28",
    "barcode": "9876543210987",
    "photo": "pliers.jpg"
  },
  {
    "tool_name": "Level",
    "manufacturer": "DeWalt",
    "model": "DWHT43003",
    "barcode": "5432109876543",
    "photo": "level.jpg"
  },
  {
    "tool_name": "Tape measure",
    "manufacturer": "Milwaukee",
    "model": "48-22-6616",
    "barcode": "8765432109876",
    "photo": "tape_measure.jpg"
  },
  {
    "tool_name": "Circular saw",
    "manufacturer": "Makita",
    "model": "XSH03Z",
    "barcode": "6543210987654",
    "photo": "circular_saw.jpg"
  },
  {
    "tool_name": "Drill",
    "manufacturer": "Ryobi",
    "model": "P208B",
    "barcode": "3210987654321",
    "photo": "drill.jpg"
  }
]
[
{
"tool_name": "Hammer",
"manufacturer": "Stanley",
"model": "STHT51304",
"barcode": "0123456789012",
"photo": "hammer.jpg"
},
{
"tool_name": "Screwdriver",
"manufacturer": "Craftsman",
"model": "CMHT65045",
"barcode": "1122334455667",
"photo": "screwdriver.jpg"
},
{
"tool_name": "Pliers",
"manufacturer": "Klein Tools",
"model": "D2000-28",
"barcode": "9876543210987",
"photo": "pliers.jpg"
},
{
"tool_name": "Level",
"manufacturer": "DeWalt",
"model": "DWHT43003",
"barcode": "5432109876543",
"photo": "level.jpg"
},
{
"tool_name": "Tape measure",
"manufacturer": "Milwaukee",
"model": "48-22-6616",
"barcode": "8765432109876",
"photo": "tape_measure.jpg"
},
{
"tool_name": "Circular saw",
"manufacturer": "Makita",
"model": "XSH03Z",
"barcode": "6543210987654",
"photo": "circular_saw.jpg"
},
{
"tool_name": "Drill",
"manufacturer": "Ryobi",
"model": "P208B",
"barcode": "3210987654321",
"photo": "drill.jpg"
}
]Display Item List
Let first tackle page to display tools. Create a new folder called “tools” under "app" dir (app/tools). Add a page.tsx file and copy following
import data from '@/data/inventory.json';
import Link from 'next/link';

async function getData() {
  return data;
}

export default async function ListPage() {
  const data = await getData();
  return (
    <div className=" w-full overflow-y-auto bg-slate-200 dark:bg-slate-800">
      {data.map((item, i) => (
        <Link
          href={`/tools/${item.barcode}`}
          key={`${i}`}
          className="bg-slate-100 dark:bg-slate-900 flex flex-row flex-nowrap gap-2 m-4 p-4 rounded-md"
        >
          <div className="bg-slate-200 dark:bg-slate-800 text-2xl font-bold border-2 rounded-full w-12 h-12 flex justify-center items-center">
            {item.tool_name.substring(0, 1)}
          </div>
          <div>
            <h1 className="text-base ">{item.tool_name}</h1>
            <h2 className="text-sm ">{item.manufacturer}</h2>
          </div>
        </Link>
      ))}
    </div>
  );
}
import data from '@/data/inventory.json';
import Link from 'next/link';
async function getData() {
return data;
}
export default async function ListPage() {
const data = await getData();
return (
<div className=" w-full overflow-y-auto bg-slate-200 dark:bg-slate-800">
{data.map((item, i) => (
<Link
href={`/tools/${item.barcode}`}
key={`${i}`}
className="bg-slate-100 dark:bg-slate-900 flex flex-row flex-nowrap gap-2 m-4 p-4 rounded-md"
>
<div className="bg-slate-200 dark:bg-slate-800 text-2xl font-bold border-2 rounded-full w-12 h-12 flex justify-center items-center">
{item.tool_name.substring(0, 1)}
</div>
<div>
<h1 className="text-base ">{item.tool_name}</h1>
<h2 className="text-sm ">{item.manufacturer}</h2>
</div>
</Link>
))}
</div>
);
}We are using getData to load list of tools and then iterate over returned data to display the list.
Start project with npm run dev and go to http://localhost:3000/tools
You should see list of tools
Two Column Layout
We want design layout so as to display tools in left column and tool detail in right column. Add new file layout.tsx to app/tools folder and copy following code
export default function TwoColumnLayout({
  children,
  detail = null,
}: {
  children: React.ReactNode,
  detail?: React.ReactNode,
}) {
  return (
    <div className="grid grid-cols-[320px_auto] overflow-hidden">
      <div className="flex h-screen overflow-hidden bg-slate-200 dark:bg-slate-800">
        {children}
      </div>
      <div className=" bg-slate-100 dark:bg-slate-900">{detail}</div>
    </div>
  );
}
export default function TwoColumnLayout({
children,
detail = null,
}: {
children: React.ReactNode,
detail?: React.ReactNode,
}) {
return (
<div className="grid grid-cols-[320px_auto] overflow-hidden">
<div className="flex h-screen overflow-hidden bg-slate-200 dark:bg-slate-800">
{children}
</div>
<div className=" bg-slate-100 dark:bg-slate-900">{detail}</div>
</div>
);
}Above shows UI with two columns, left one for list of items and right one for item detail. Notice layout takes two props, the default children prop and an additional detail prop. Children node is shown in left col and detail node in right.
Start project with npm run dev and go to http://localhost:3000/tools
You should see list of tools display in left column.
Display Item Detail
When user selects an item from the widget list, we want to display the selected item details. Add new folder called @detail below app\tools. Next add folder [barcode] below @detail. [barcode] defines dynamic segment and aallows us to capture the selected tool barcode. Add page.tsx to [barcode] and copy following code
import data from '@/data/inventory.json';
async function getData(barcode: string) {
const item = data.find((item) => item.barcode === barcode);
return item;
}
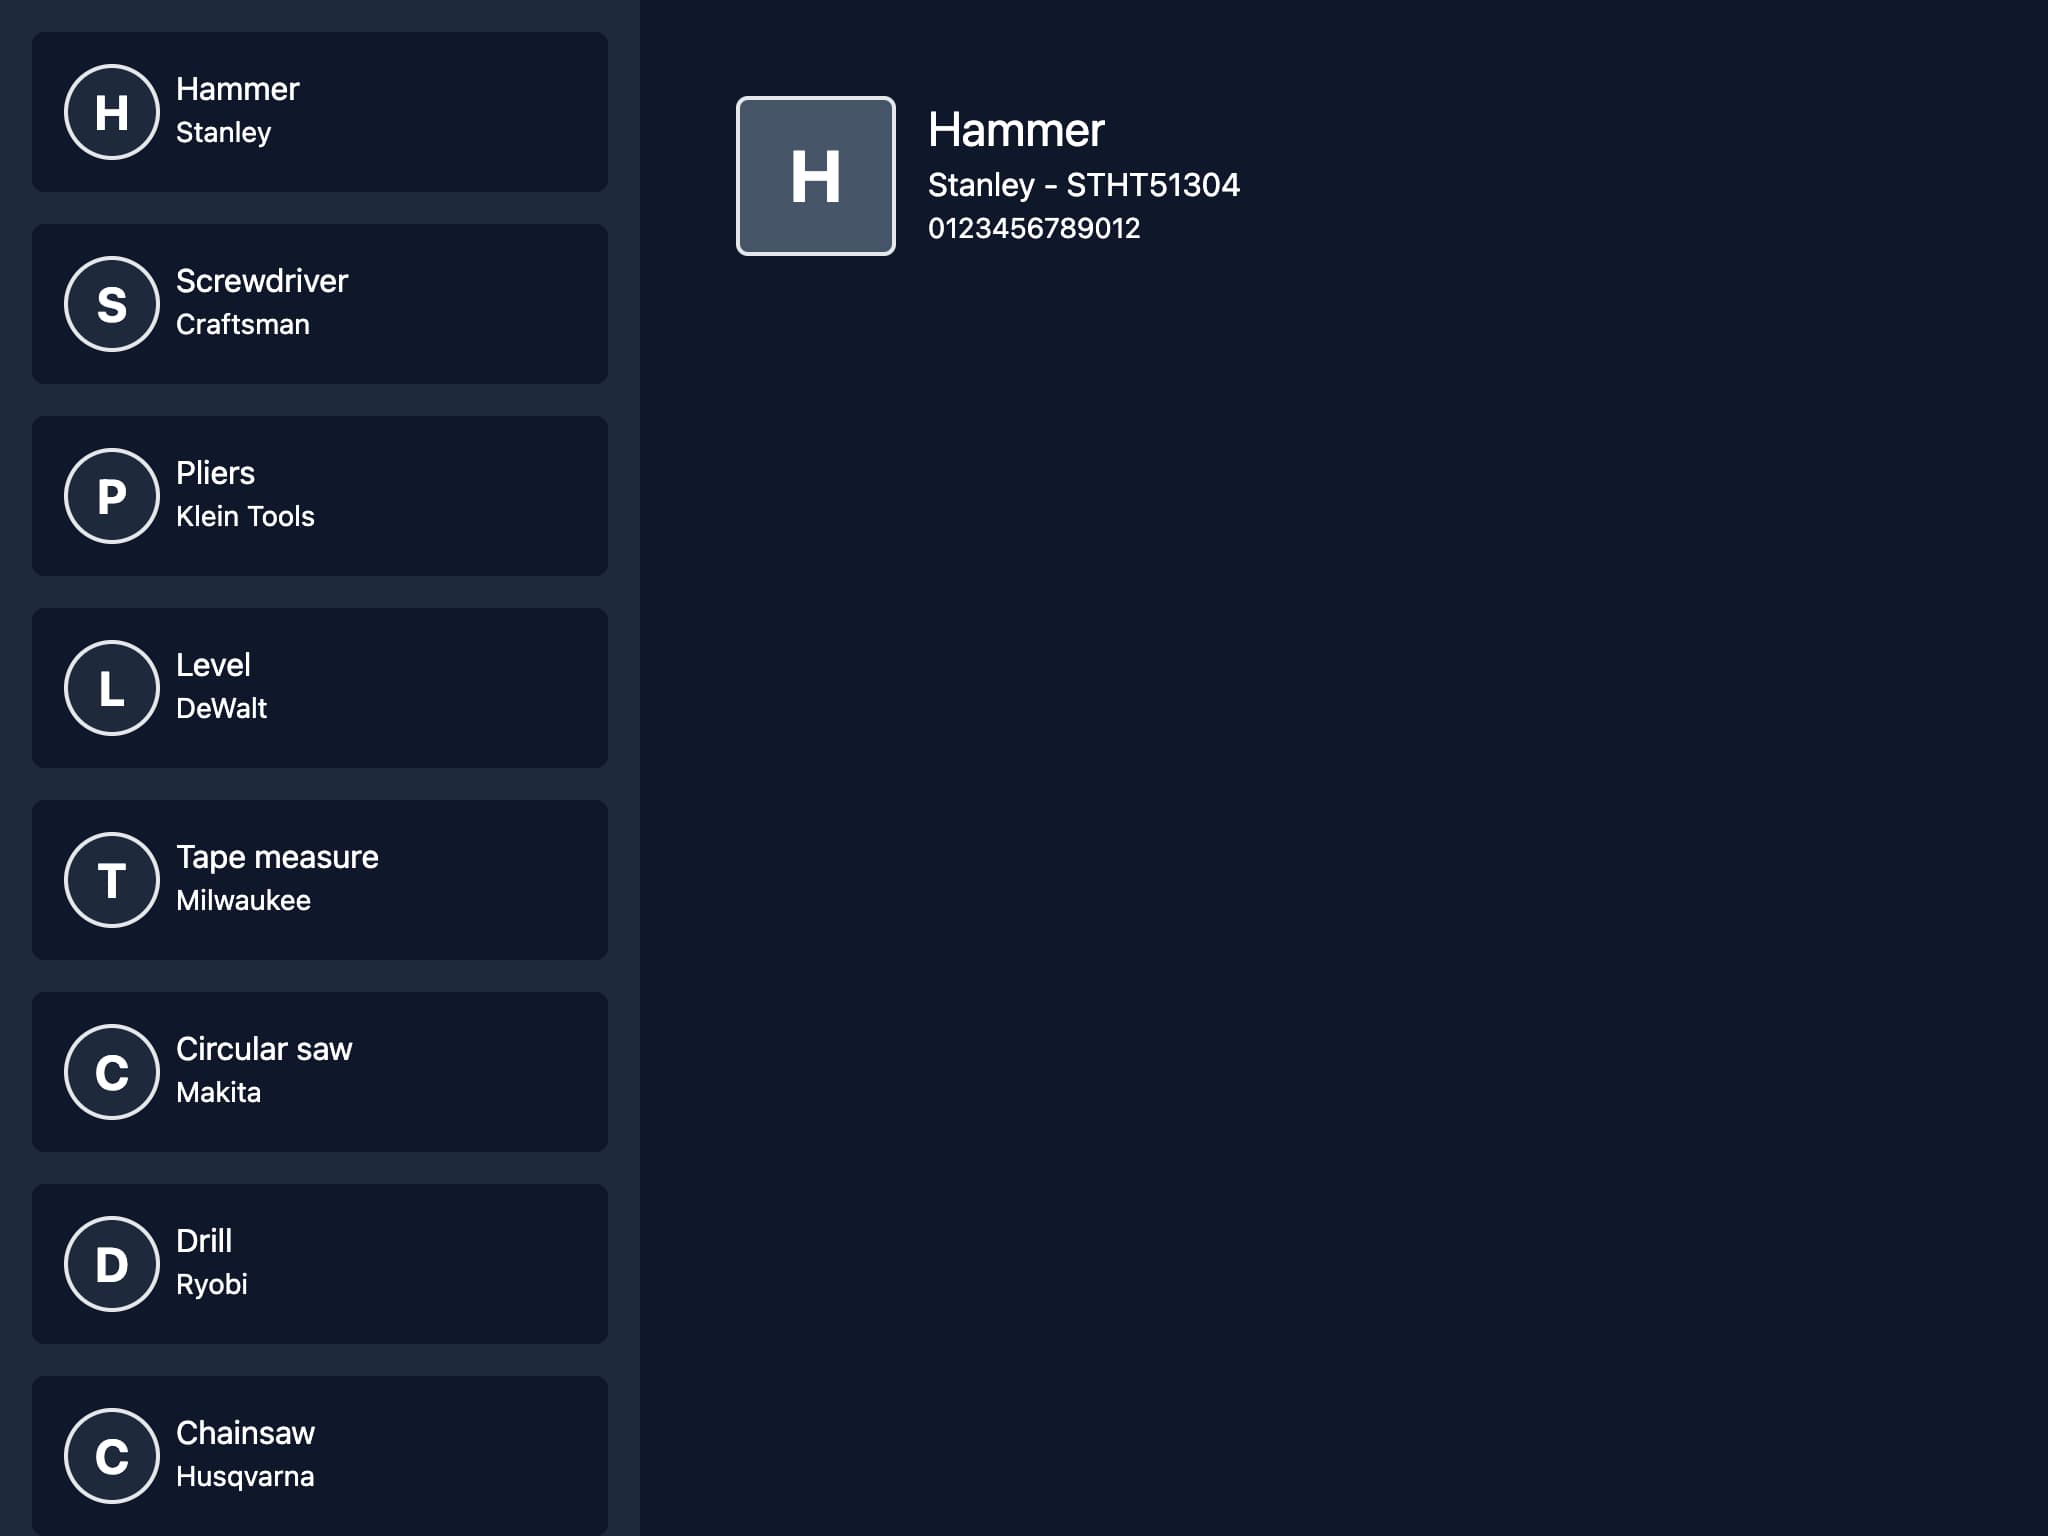
export default async function DetailPage({
params,
}: {
params: { barcode: string },
}) {
const data = await getData(params.barcode);
return (
<div className="flex flex-row flex-nowrap p-12 gap-4">
<div className="text-4xl font-bold border-2 rounded-md w-20 h-20 flex justify-center items-center bg-slate-400 dark:bg-slate-600">
{data?.tool_name.substring(0, 1)}
</div>
<div>
<h1 className="text-2xl ">{data?.tool_name}</h1>
<h2 className="text-base ">
{data?.manufacturer} - {data?.model}
</h2>
<div className="text-sm ">{data?.barcode}</div>
</div>
</div>
);
}import data from '@/data/inventory.json';
async function getData(barcode: string) {
const item = data.find((item) => item.barcode === barcode);
return item;
}
export default async function DetailPage({
params,
}: {
params: { barcode: string },
}) {
const data = await getData(params.barcode);
return (
<div className="flex flex-row flex-nowrap p-12 gap-4">
<div className="text-4xl font-bold border-2 rounded-md w-20 h-20 flex justify-center items-center bg-slate-400 dark:bg-slate-600">
{data?.tool_name.substring(0, 1)}
</div>
<div>
<h1 className="text-2xl ">{data?.tool_name}</h1>
<h2 className="text-base ">
{data?.manufacturer} - {data?.model}
</h2>
<div className="text-sm ">{data?.barcode}</div>
</div>
</div>
);
}We read barcode of user selected tool from params and load tool details.
One last detail, add page.tsx to @detail folder and copy following code
export default function Page() {
  return null;
}
export default function Page() {
return null;
}Above will be displayed when no tool is selected
Start project with npm run dev and go to http://localhost:3000/tools
Select a tool from list, selected tool details will be shown in right column
Default on Refresh
If you try to refresh page when an item is selected, you will get 404. This 404 due to unmatched route, and to fix it add default.tsx to tools and copy following code
import ListPage from './page';

export default ListPage;
import ListPage from './page';
export default ListPage;Now when you refresh the browser with a tool selected, it works!
Next Steps
We explored one way to utilize Parallel routing to display list and selected item detail in a side-by-side two column layout. Hopefully you now have a good idea of how to display multiple pages in same layout view using parallel route slot mechanism. You can show multiple slots in same layout, like for dashboard, feed views and other UI views.
Find Source code with a ready to run project @ GitHub
CreateAppAI
CreateAppAI auto generates List-Detail parallel route and supports host of other route patterns.